Connecting to your Raspberry Pi remotely using SSH from behind a router on Windows 10 has never been easier. Whether you're a tech enthusiast, hobbyist, or professional developer, this guide will walk you through every step to ensure seamless access to your Raspberry Pi from anywhere in the world.
In today's digital age, remote access to devices is essential for productivity and convenience. With the growing popularity of Raspberry Pi in home automation, IoT projects, and server management, understanding how to set up remote SSH access is critical. This guide ensures that even beginners can follow along and achieve success.
By the end of this article, you'll have a comprehensive understanding of SSH (Secure Shell), port forwarding, and the necessary configurations required to access your Raspberry Pi remotely from your Windows 10 device. Let's dive in!
Read also:Exploring The World Of Animation By Maplestar A Comprehensive Guide
Table of Contents
- Introduction to SSH
- Raspberry Pi Overview
- Setup SSH on Raspberry Pi
- Port Forwarding
- Connecting to Raspberry Pi
- Troubleshooting
- Enhancing Security
- Advanced Techniques
- Benefits of Remote SSH
- Conclusion
Introduction to SSH
SSH, or Secure Shell, is a cryptographic network protocol used to secure communication between two networked devices. It provides a safe way to connect to your Raspberry Pi remotely, ensuring that all data transmitted is encrypted and protected from unauthorized access.
SSH is widely used in IT infrastructure for remote server management, file transfers, and automation tasks. For Raspberry Pi users, SSH enables remote access to the command line interface, allowing you to manage your device without needing physical access.
Why SSH Is Important
- SSH encrypts all data, ensuring secure communication.
- It supports authentication methods, such as passwords and SSH keys, enhancing security.
- SSH allows remote access from anywhere in the world with an internet connection.
Raspberry Pi Overview
The Raspberry Pi is a small, affordable computer that has gained immense popularity among hobbyists, educators, and professionals. Its versatility makes it ideal for various projects, from home automation to web servers.
When setting up remote SSH access to your Raspberry Pi, it's essential to understand its architecture and capabilities. The Raspberry Pi runs on Linux-based operating systems, such as Raspberry Pi OS, making it compatible with SSH out of the box.
Key Features of Raspberry Pi
- Compact size and low power consumption.
- Supports a wide range of programming languages and frameworks.
- Highly customizable for different applications.
Setup SSH on Raspberry Pi
Before you can access your Raspberry Pi remotely, you need to enable SSH on the device. This process is straightforward and can be done in just a few steps.
Enabling SSH on Raspberry Pi
- Power on your Raspberry Pi and log in to the operating system.
- Open the terminal and type
sudo raspi-config. - Navigate to "Interfacing Options" and select "SSH".
- Choose "Yes" to enable SSH and then exit the configuration tool.
Alternatively, you can enable SSH by creating an empty file named "ssh" on the boot partition of your Raspberry Pi's SD card.
Read also:Movierulzcom Kannada 2024 Your Ultimate Guide To Free And Legal Movie Streaming
Port Forwarding
Port forwarding is a crucial step in accessing your Raspberry Pi remotely from behind a router. It allows external devices to connect to your Raspberry Pi by directing incoming traffic to the correct internal IP address.
Steps to Set Up Port Forwarding
- Log in to your router's admin interface using its IP address (usually 192.168.0.1 or 192.168.1.1).
- Navigate to the "Port Forwarding" or "NAT" section.
- Create a new rule, specifying the external port (e.g., 22) and the internal IP address of your Raspberry Pi.
- Save the settings and restart your router if necessary.
For additional security, consider using a non-standard port instead of the default SSH port (22).
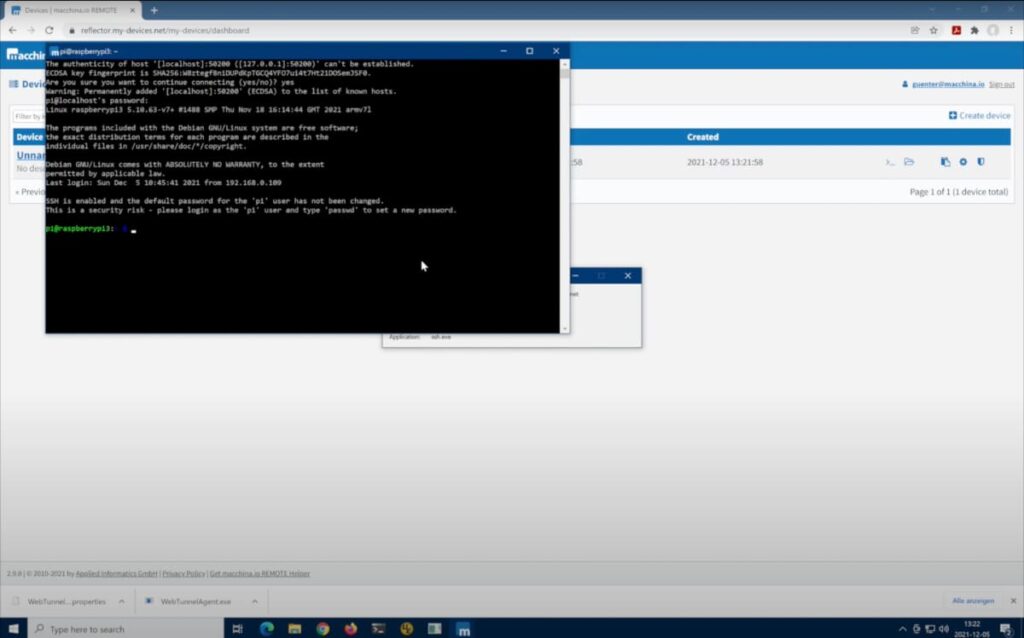
Connecting to Raspberry Pi
Once SSH is enabled and port forwarding is configured, you can connect to your Raspberry Pi remotely using a Windows 10 device. There are several methods to achieve this, each with its own advantages.
Using PuTTY
PuTTY is a popular SSH client for Windows that allows you to establish a secure connection to your Raspberry Pi.
- Download and install PuTTY from the official website.
- Open PuTTY and enter your Raspberry Pi's external IP address in the "Host Name" field.
- Set the port to 22 (or the custom port you configured) and select "SSH" as the connection type.
- Click "Open" and log in using your Raspberry Pi's credentials.
Using Windows Terminal
Windows 10 includes a built-in SSH client that can be used directly from the command prompt or PowerShell.
- Open Command Prompt or PowerShell.
- Type
ssh username@external_ip, replacing "username" and "external_ip" with your Raspberry Pi's details. - Enter your password when prompted to establish the connection.
Troubleshooting
While setting up remote SSH access to your Raspberry Pi is generally straightforward, issues can arise. Here are some common problems and their solutions:
Connection Refused
- Ensure SSH is enabled on your Raspberry Pi.
- Verify that port forwarding is correctly configured on your router.
- Check your firewall settings to ensure they are not blocking incoming SSH connections.
Timeout Errors
- Make sure your Raspberry Pi is connected to the internet.
- Double-check the external IP address and port number you're using.
- Try restarting your router and Raspberry Pi to resolve any temporary network issues.
Enhancing Security
While SSH provides secure communication, additional measures can further protect your Raspberry Pi from unauthorized access.
Use SSH Keys Instead of Passwords
SSH keys offer a more secure authentication method compared to passwords. Here's how to set them up:
- Generate an SSH key pair on your Windows 10 device using PuTTYgen or the built-in SSH client.
- Copy the public key to your Raspberry Pi's
~/.ssh/authorized_keysfile. - Disable password authentication in the SSH configuration file (
/etc/ssh/sshd_config) to enforce key-based access.
Change the Default SSH Port
Using a non-standard port reduces the risk of automated attacks targeting the default SSH port (22).
Advanced Techniques
For users seeking more advanced functionality, there are several techniques to enhance your remote SSH experience.
Dynamic Port Forwarding
Dynamic port forwarding allows you to use your Raspberry Pi as a SOCKS proxy, enabling secure browsing and accessing blocked websites.
- Set up dynamic port forwarding in PuTTY or Windows Terminal.
- Configure your web browser to use the SOCKS proxy for encrypted browsing.
SSH Tunneling
SSH tunneling enables you to securely access services running on your Raspberry Pi, such as a web server or database.
- Create a local or remote SSH tunnel using the appropriate command syntax.
- Access the service through the tunnel as if it were running locally.
Benefits of Remote SSH
Remote SSH access to your Raspberry Pi offers numerous advantages, making it an indispensable tool for modern computing.
Increased Productivity
- Manage your Raspberry Pi from anywhere without needing physical access.
- Streamline workflows by automating tasks through remote scripts and commands.
Enhanced Security
- Secure communication ensures data privacy and protection from cyber threats.
- SSH keys and other advanced techniques provide robust authentication and encryption.
Conclusion
Remote SSH access to your Raspberry Pi behind a router on Windows 10 is a powerful capability that opens up endless possibilities for innovation and productivity. By following the steps outlined in this guide, you can confidently set up and manage your Raspberry Pi from anywhere in the world.
We encourage you to experiment with the advanced techniques discussed and share your experiences in the comments below. Don't forget to explore other articles on our site for more tips and tricks to enhance your Raspberry Pi projects!