Raspberry Pi remote IO setup free has become a popular solution for hobbyists, developers, and professionals looking to control devices remotely without spending extra money on software licenses or subscriptions. This powerful single-board computer offers flexibility, scalability, and endless possibilities for IoT projects, home automation, and more. If you're new to Raspberry Pi or simply want to enhance your skills in remote IO configuration, this article will provide step-by-step guidance and valuable insights to help you get started.
Raspberry Pi is more than just a compact computer—it’s a versatile tool that can connect various sensors, actuators, and peripherals. By setting up remote IO functionality, you can control and monitor your devices from anywhere in the world. Whether you're automating your home, managing industrial equipment, or experimenting with IoT applications, understanding how to configure Raspberry Pi for remote IO is essential.
In this article, we'll delve into the intricacies of Raspberry Pi remote IO setup free, exploring everything from basic configurations to advanced techniques. We'll also cover best practices, troubleshooting tips, and recommended resources to ensure your project runs smoothly. Let's dive in!
Read also:Discover The Secrets Of Pijat Mbah Maryono Terbaru A Complete Guide
Table of Contents
- Introduction to Raspberry Pi Remote IO
- Benefits of Free Raspberry Pi Remote IO Setup
- Tools and Software Needed for Setup
- Step-by-Step Guide to Raspberry Pi Remote IO Setup
- Configuring Network Settings for Remote Access
- Understanding Raspberry Pi IO Pins
- Securing Your Raspberry Pi Remote IO Configuration
- Real-World Applications of Raspberry Pi Remote IO
- Common Issues and Troubleshooting Tips
- Future Trends in Raspberry Pi Remote IO
Introduction to Raspberry Pi Remote IO
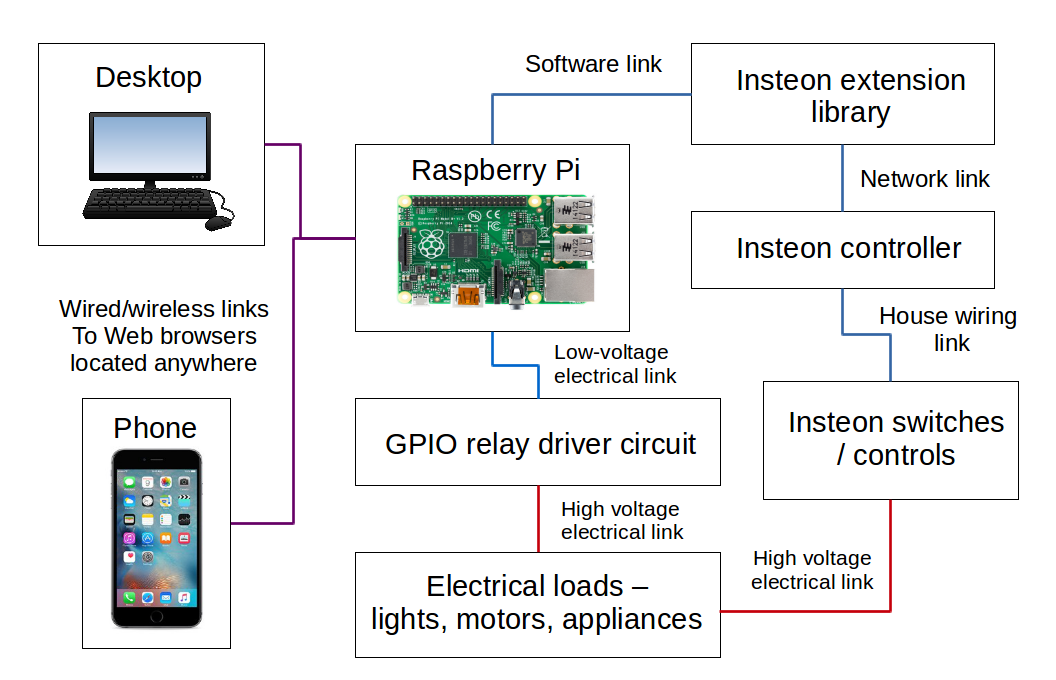
Raspberry Pi remote IO setup free involves configuring your Raspberry Pi to act as a remote input/output controller. This setup enables you to control external devices, such as lights, motors, or sensors, from a remote location. The process typically includes setting up network connectivity, configuring GPIO pins, and implementing software solutions to facilitate communication between your Raspberry Pi and the devices it controls.
For beginners, understanding the basics of Raspberry Pi remote IO is crucial. This includes learning about the different types of IO pins, how they function, and the software tools available for managing them. Additionally, familiarizing yourself with networking concepts and security measures will help ensure your setup is both functional and safe.
Why Choose Raspberry Pi for Remote IO?
- Cost-effective solution for IoT projects
- Highly customizable and compatible with various peripherals
- Large community support and extensive documentation
- Supports multiple programming languages and platforms
Benefits of Free Raspberry Pi Remote IO Setup
One of the most appealing aspects of Raspberry Pi remote IO setup free is the cost savings it offers. Unlike commercial solutions that require expensive licenses or subscriptions, Raspberry Pi allows you to achieve similar functionality without breaking the bank. Additionally, the open-source nature of Raspberry Pi means you have access to a wide range of free software tools and libraries to enhance your setup.
Another benefit is the flexibility it provides. With Raspberry Pi, you can tailor your remote IO configuration to meet your specific needs, whether you're working on a small-scale project or a large enterprise-level application. Furthermore, the ability to integrate with cloud services and other platforms expands its potential even further.
Key Advantages of Free Setup
- No recurring costs for software licenses
- Access to a vast array of free resources and tutorials
- Ability to customize and scale your setup as needed
- Compatibility with multiple operating systems and programming languages
Tools and Software Needed for Setup
To successfully complete your Raspberry Pi remote IO setup free, you'll need a few essential tools and software components. These include:
- Raspberry Pi board (preferably Raspberry Pi 4 or newer)
- Power supply and microSD card with Raspberry Pi OS installed
- Network cables or Wi-Fi dongle for connectivity
- SSH client (e.g., PuTTY for Windows or Terminal for macOS/Linux)
- Software libraries for GPIO management (e.g., RPi.GPIO or WiringPi)
Additionally, you may want to consider using a cloud platform like AWS IoT or Google Cloud IoT for enhanced functionality and scalability.
Read also:Sophie Rain Spiderman Instagram Exploring The Rise Of A Marvelinspired Sensation
Step-by-Step Guide to Raspberry Pi Remote IO Setup
Setting up Raspberry Pi for remote IO involves several key steps. Below is a comprehensive guide to help you through the process:
Step 1: Install Raspberry Pi OS
Begin by downloading the latest version of Raspberry Pi OS from the official website and flashing it onto your microSD card. Insert the card into your Raspberry Pi and power it on.
Step 2: Configure Network Settings
Connect your Raspberry Pi to your local network using either Ethernet or Wi-Fi. Ensure that your device has a stable internet connection to facilitate remote access.
Step 3: Enable SSH and VNC
SSH and VNC are essential for remote access to your Raspberry Pi. Enable these services in the Raspberry Pi Configuration tool or by editing the configuration files directly.
Step 4: Install GPIO Libraries
Install the necessary libraries for managing GPIO pins. Popular choices include RPi.GPIO for Python and WiringPi for C-based applications.
Step 5: Test Your Setup
Once everything is configured, test your setup by writing a simple script to control an LED or other basic device connected to your Raspberry Pi.
Configuring Network Settings for Remote Access
Proper network configuration is critical for successful Raspberry Pi remote IO setup free. Ensure that your Raspberry Pi is assigned a static IP address to avoid connectivity issues. Additionally, configure port forwarding on your router to allow external access to your device.
For added security, consider setting up a Virtual Private Network (VPN) or using SSH tunneling to encrypt your communications. This will help protect your Raspberry Pi from unauthorized access and potential cyber threats.
Understanding Raspberry Pi IO Pins
Raspberry Pi offers a variety of IO pins that can be used for different purposes. These include:
- GPIO (General Purpose Input/Output) pins for controlling external devices
- I2C pins for communicating with other devices using the I2C protocol
- SPI pins for high-speed data transfer
- UART pins for serial communication
Understanding the functions and limitations of each pin type is essential for designing effective remote IO applications.
Securing Your Raspberry Pi Remote IO Configuration
Security should be a top priority when setting up Raspberry Pi for remote IO. Implement the following best practices to safeguard your device:
- Change the default username and password
- Disable unnecessary services and ports
- Keep your software and firmware up to date
- Use strong encryption for all communications
Regularly monitoring your system for suspicious activity and backing up important data can also help mitigate risks.
Real-World Applications of Raspberry Pi Remote IO
Raspberry Pi remote IO setup free has numerous practical applications across various industries. Some examples include:
- Home automation systems for controlling lighting, temperature, and security
- Industrial automation for monitoring and managing machinery
- Agricultural solutions for remote irrigation and crop monitoring
- Healthcare devices for patient monitoring and data collection
These applications demonstrate the versatility and potential of Raspberry Pi in solving real-world problems.
Common Issues and Troubleshooting Tips
Despite its simplicity, Raspberry Pi remote IO setup free can sometimes present challenges. Below are some common issues and their solutions:
- Connection problems: Verify network settings and check for firewall restrictions.
- GPIO pin conflicts: Ensure that no two processes are trying to control the same pin simultaneously.
- Software errors: Update your libraries and scripts to the latest versions.
- Security breaches: Review your security settings and apply patches as needed.
Future Trends in Raspberry Pi Remote IO
The future of Raspberry Pi remote IO looks promising, with advancements in technology and increasing demand for IoT solutions. Some emerging trends include:
- Integration with AI and machine learning for smarter applications
- Enhanced security features to protect against cyber threats
- Improved performance and efficiency through hardware upgrades
- Expanded compatibility with new devices and platforms
As the Raspberry Pi ecosystem continues to grow, so too will the possibilities for remote IO applications.
Conclusion
In conclusion, Raspberry Pi remote IO setup free offers a cost-effective and flexible solution for controlling devices remotely. By following the steps outlined in this article and adhering to best practices, you can successfully configure your Raspberry Pi for a wide range of applications. Remember to prioritize security and stay up to date with the latest developments in the field.
We encourage you to share your experiences and insights in the comments section below. Additionally, feel free to explore our other articles for more information on Raspberry Pi and related topics. Happy tinkering!